Three CHEERS for new technical toys! Here at iCreaTech we’re not just builders of all things IT, designers of web creations, schemers of traffic redirection, were also photographers; which really means we get to play with LOTS of new toys! When shopping toys, like the average “techie”, I am always looking for the latest and greatest find. It’s always great if it’s also user friendly and most importantly the best regarding bang for my buck. Well, I’ve hit the jackpot with Photomatix Pro. All of this raving about new technical toys is really just an excuse to tell you about my newest photographic love, HDR (High Dynamic Range) photography and how I’m able to make an almost drab photograph into an eye catching creation. Although this isn’t my first try with HDR, I’ve never been able to achieve the amazing results that Photomatrix Pro can deliver. For the optimal HDR experience, a photograph with extreme light levels can really take advantate of Photomatrix Pro’s ability to work it’s magic. Try making your own HDR creation with a quick download of the trial version of Photomatrix Pro for either Windows or Mac. Keep in mind that although you can use HDR pictures with .jpg files, RAW format files can give greater flexibility in processing.
1) Shoot your photos:
When you setup your camera to shoot for HDR, set your camera in aperture priority mode and use a tripod to avoid any discrepancy in the multiple photos you’ll merge to make your HDR. Although you can use as many or as few photos as you like, I tend to use 3 photos most often. Turn on your Autobracketing. For 3 pics in autobracket, set it up at -2, 0, +2.
2) Import your photos:
Once I’ve taken my photos and I’m ready to bring them into Photomatrix Pro, I import them to my PC with Adobe Lightroom 3. Below you can see then photos of the Alamo that I’ll merge to create my HDR photograph.

3) Make your HDR magic!
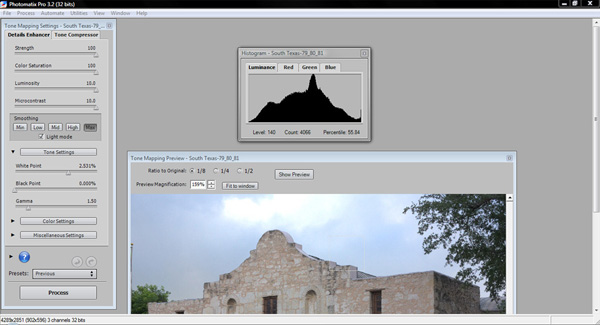
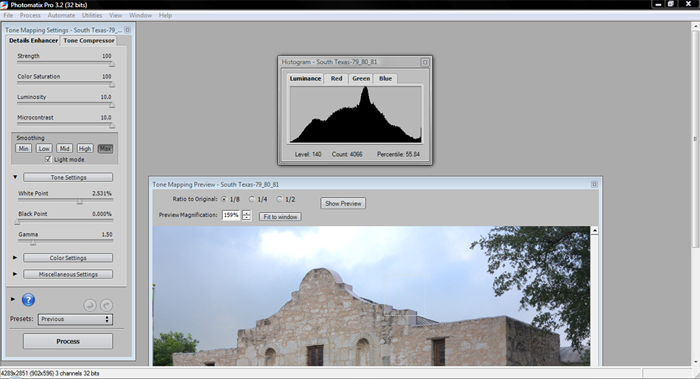
Open Photomatrix and prepare to work magic on your photos!  Once you’ve opened Photomatrix and clicked the “Generate HDR Image” button, the ‘Selecting Source Images’ box opens. Click “browse” to choose the photos you want to import. You need to import all photos as once. To do this, click one file, hold down your control key on a PC or command key on a mac, and continue by clicking each file you want to be imported. Once all files are selected, click open and Photomatrix will align and merge the files. NOW the MAGIC begins:) Strength – Keep it at 100%. Color Saturation – Remember, HDR is about light, not about over-saturation! Every photo is different. You don’t want a photo that makes you think you are hallucinating; you just want the color to POP! Luminosity – There will be less contrast in your photo, when you slide to the right. Just use your eye and do what pleases you. Microcontrast – Creates fluctuations in color, on a small scale and also helps with the graininess or noise. Smoothing – This is where the HDR effect is applied. Psychodelic go left, melodic go right. White Point & Black Point – The idea here is to have the right amount of light, if your histogram is to far to the left or right you are loosing or adding too much light. Use this to move your bell curve of the histogram to the center.
4) Process your HDR results:
Once you are done playing with all of the sliders, you can click the “Process” button. Tada done with HDR! You can also make additional changes to photograph in Photoshop or Lightroom if you feel it needs any cleanup. For a Quick and Easy Magic Trick, Photomatrix Pro gets a thumbs up at iCreaTech.
5) Brag it up to your friends!
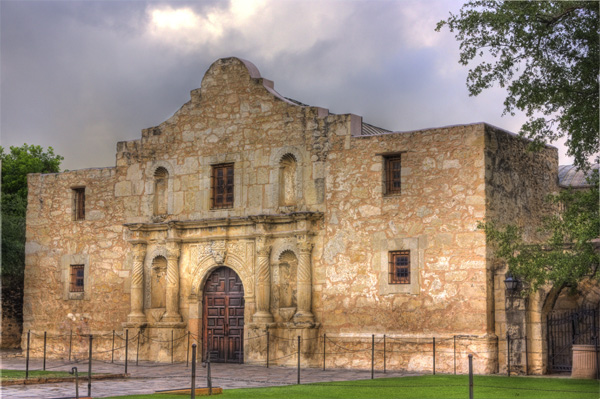
You know you want to impress people with your new mad HDR skills! Go for it. Check out my more dramatic High Dynamic Alamo below! Now go try it for yourself!


